Onboarding Ambassadors and Incentivising Participation
A common problem faced in ambassador marketing is onboarding ambassadors into a program and getting them to actively participate when they join.
Setting up ambassadors on a program and familiarizing them with how to complete activities and drive referrals for your brand can be a challenge.
Making it easy for ambassadors to get set up and giving them an immediate reward is a great way to onboard and familiarize them with your ambassador marketing program.
With a reward on sign up, we see that brands are able to achieve higher overall activity and participation from ambassadors.
In this video, we go into how you can easily send personalized welcome emails to onboard ambassadors and issue them a reward for getting set up.
Sending a personalized email
When ambassadors join a program, a great first step for the brand is to give them a personalized and authentic welcome. One way to welcome ambassadors is to send them an introduction email saying congratulations, providing details of the program, and a call to action.
Example Introduction Email
Hi {{ambassador.first.name}},
{{program.manager}} here from {{brand.name}}. We are super excited to have you apart of our team!
First things first. Register for our program to get your {{reward}} by clicking here! {{register.url}}
Ready? Let’s go!
Here are the best ways to earn awesome rewards.
{{program.details}}
That’s it for now! Go ahead and grab that {{reward}} and welcome again to our amazing family, {{ambassador.first.name}}.
Be sure to stay on the lookout for more information on ambassador benefits, new {{brand.name}} promotions and up to date news.
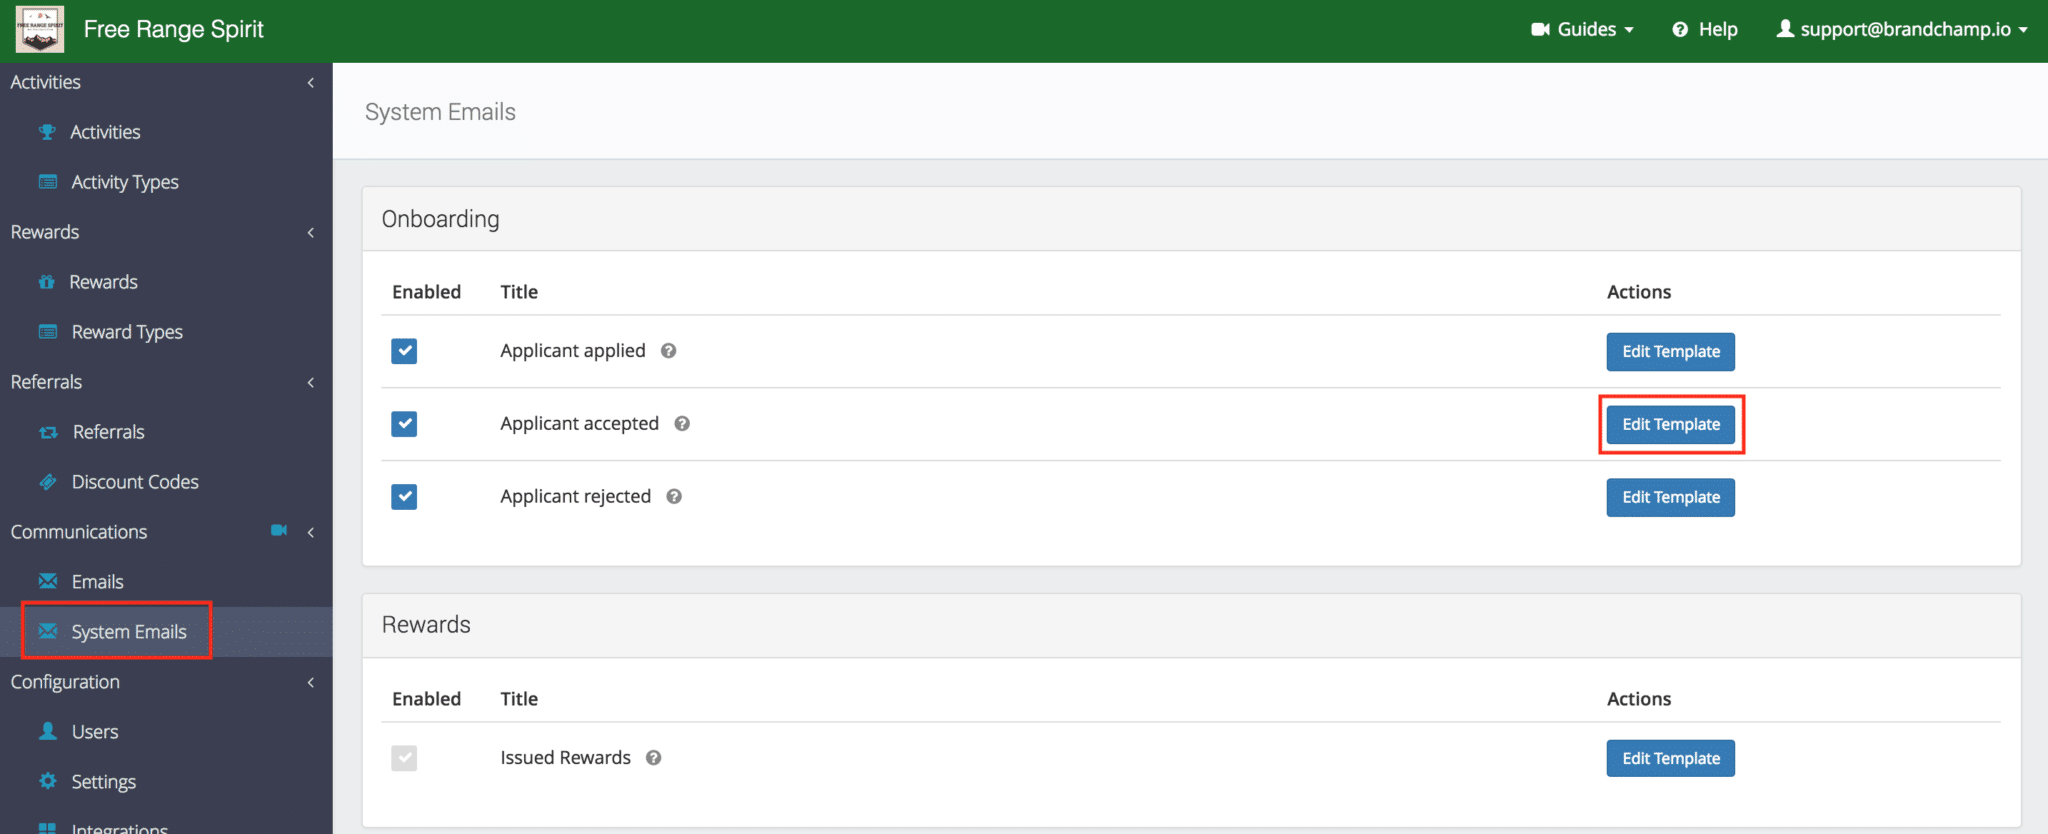
To create a personalized welcome email in BrandChamp let’s go to the “System Emails” page under the Communications section.
In the System Emails page, click “Edit Template” for the Applicant Accepted Email.
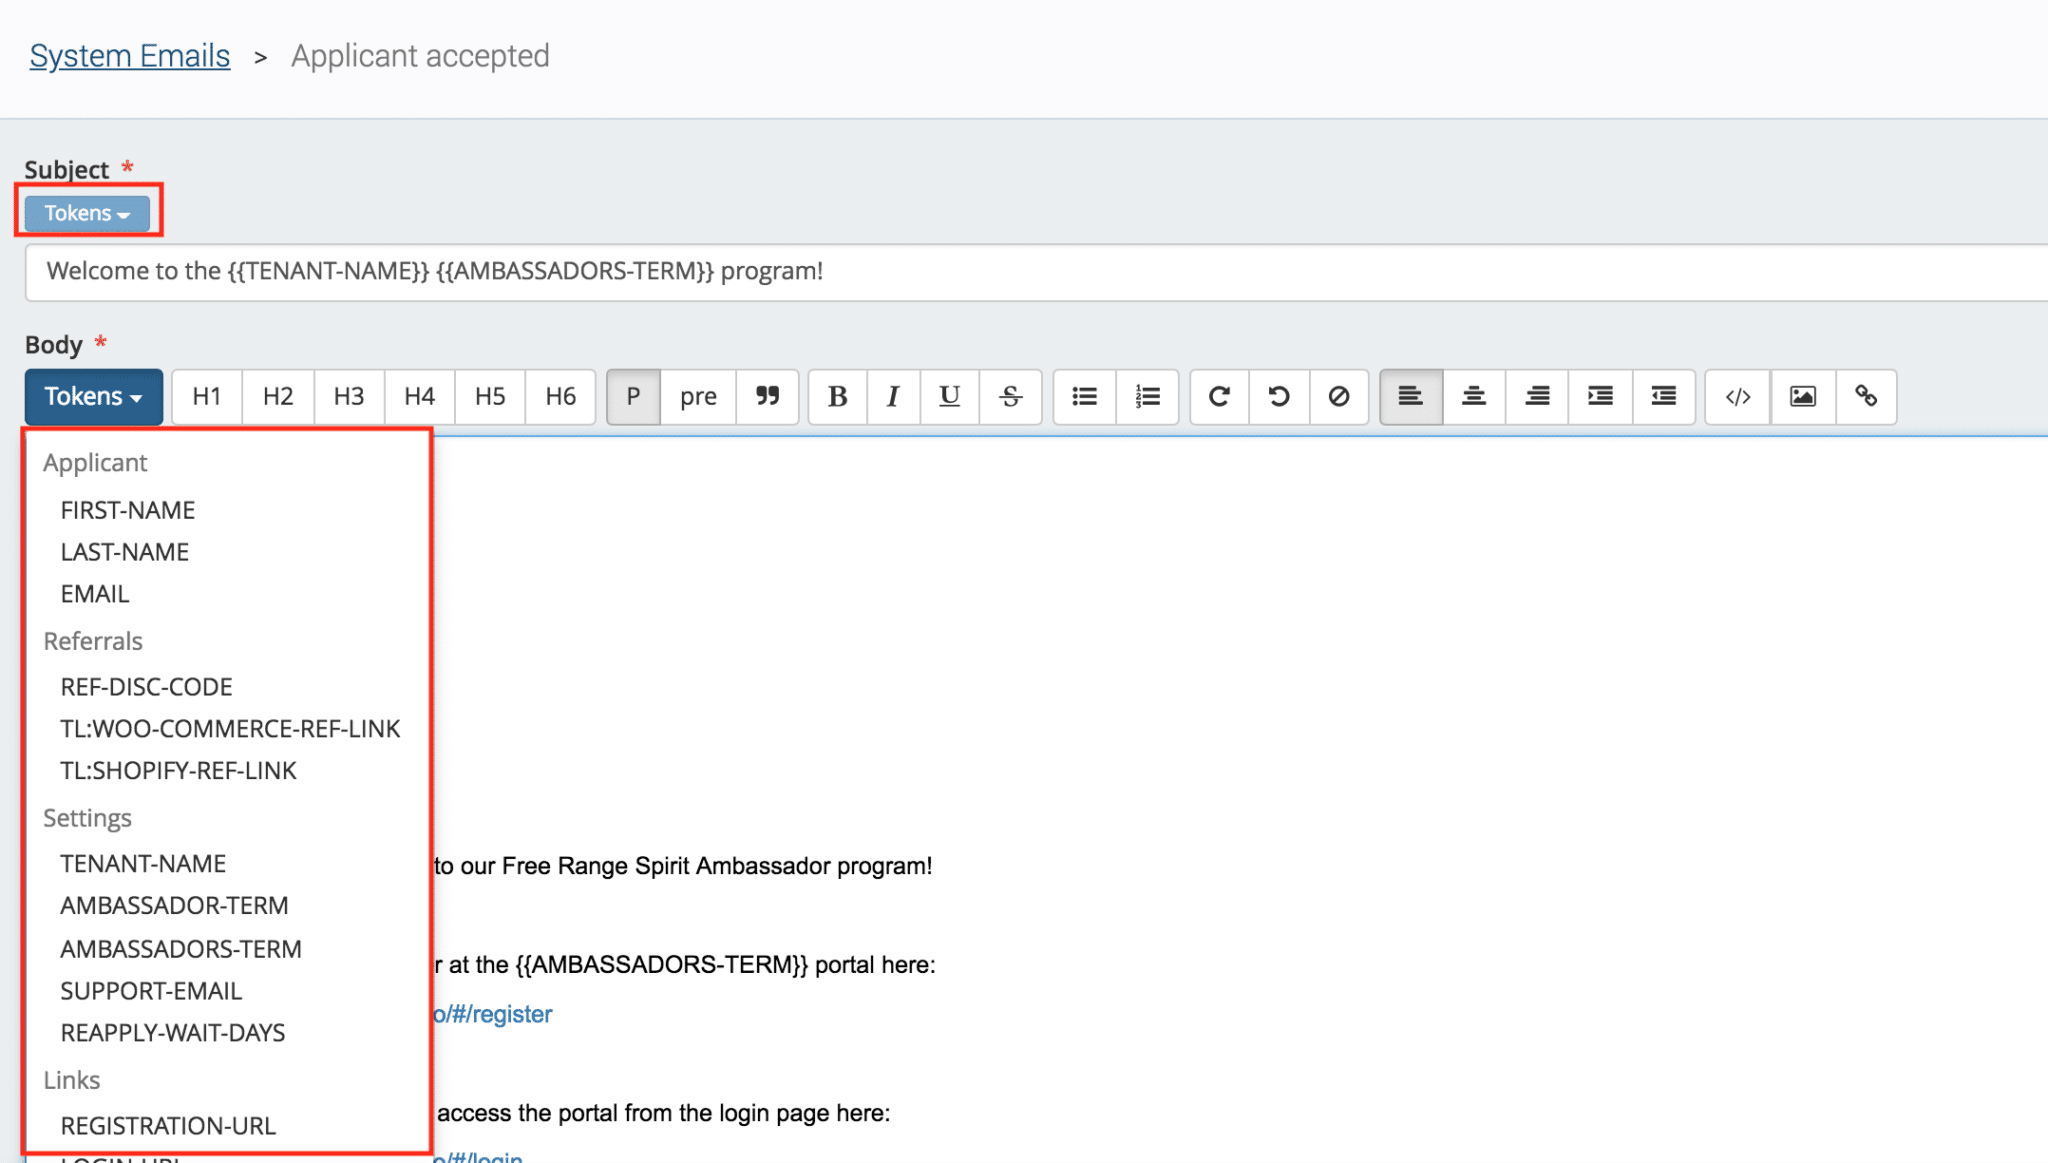
After clicking “Edit Template” we can now create a personalized email by using the Tokens feature.
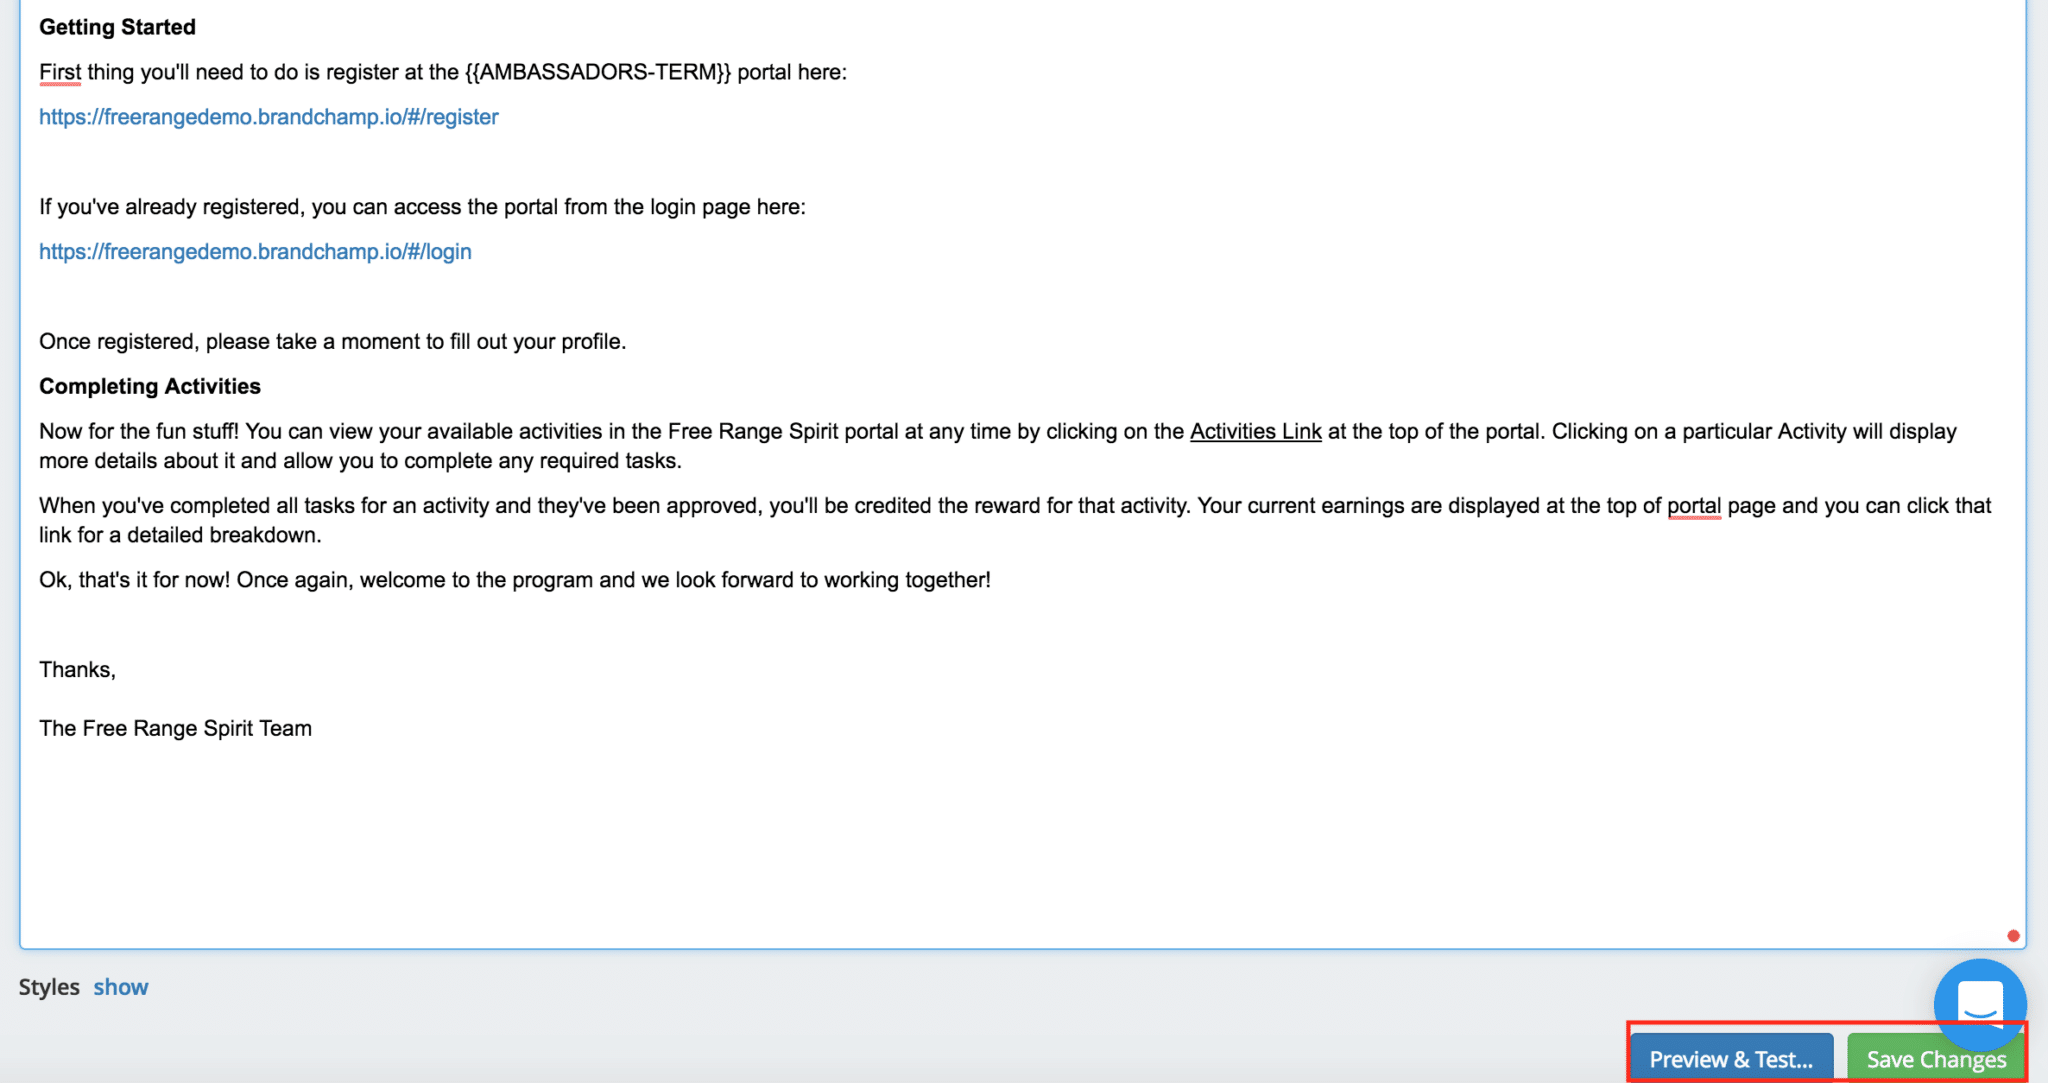
When the email is finished, you can “Preview and Test” the email or “Save Changes” by scrolling to the bottom of the page. After changes are saved, all accepted/approved ambassadors will receive this email from the software.
Creating an Onboarding Reward
After being welcomed into the program the brand should reward ambassadors for joining the program. When ambassadors are given a reward upon entry, they now have material to promote and an incentive to participate frequently. Common rewards that ambassadors traditionally receive is a free t-shirt, brand merchandise, or a special store discount.
To create an onboarding reward in BrandChamp go to the “Reward types” page in the BrandChamp Admin portal.
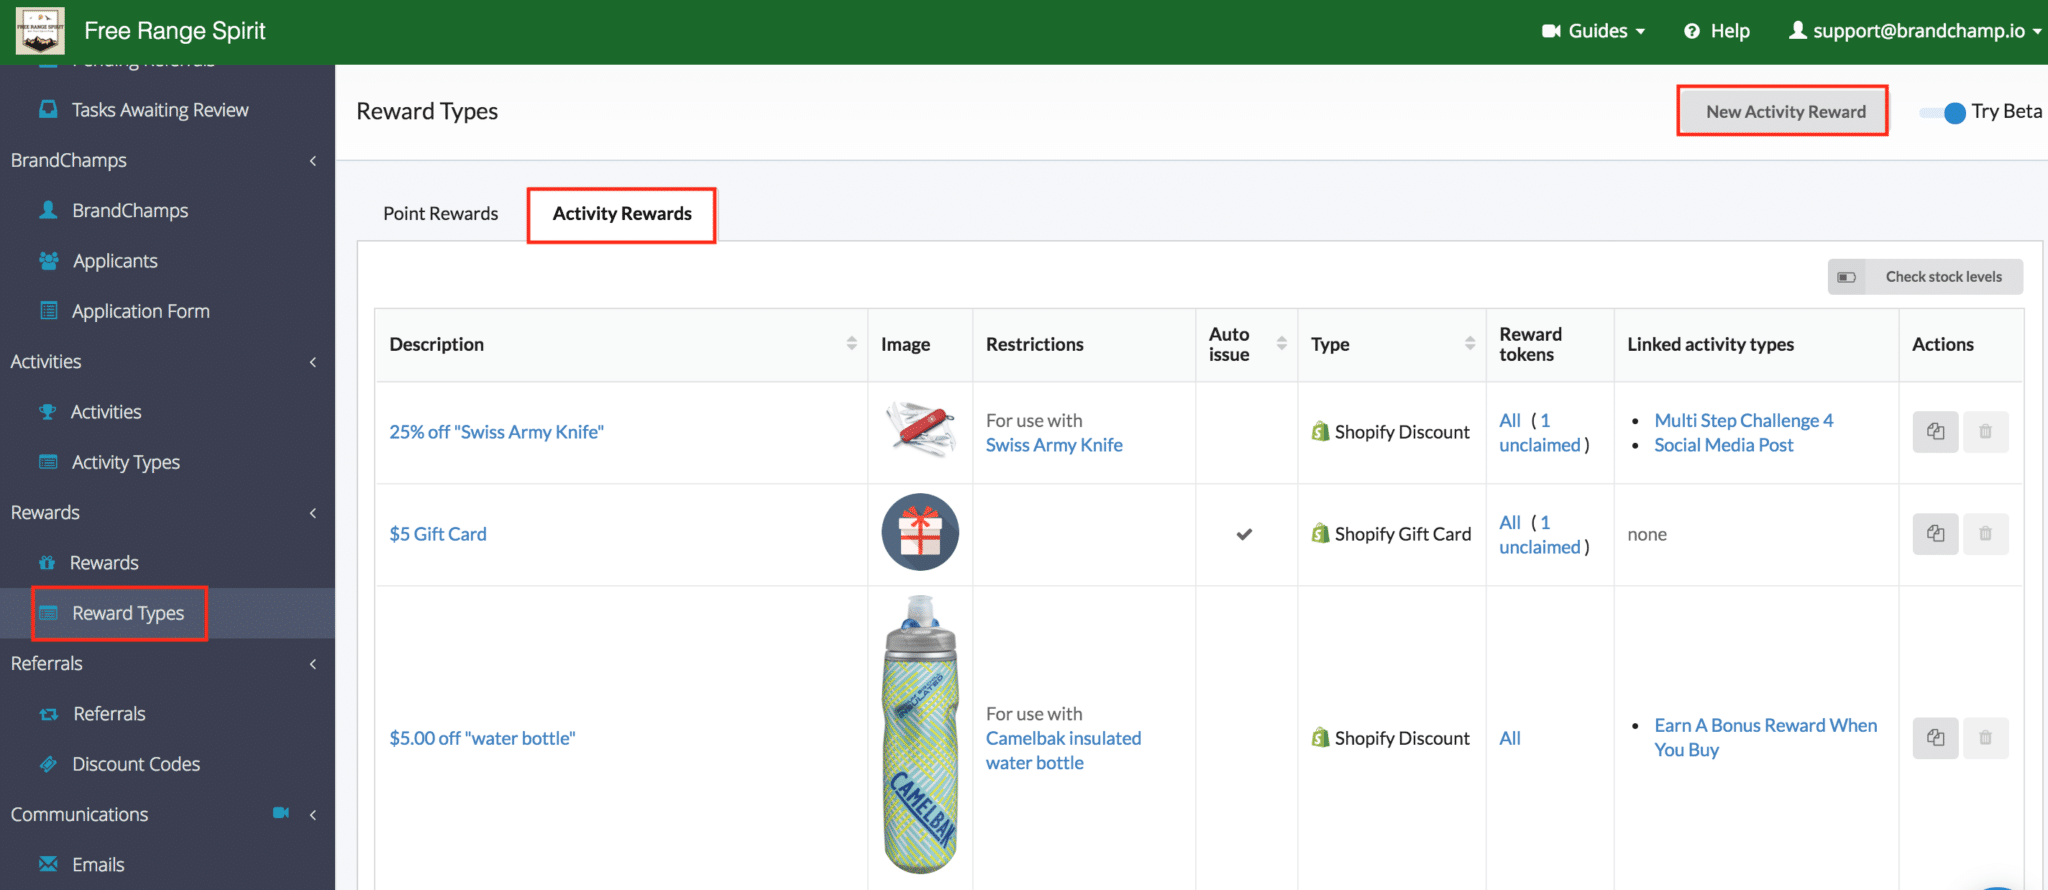
From here select the “Activity Rewards” tab and click the “New Activity Reward button in the top left.
In the new Activity reward setup, select the type of reward that you want to issue. Remember the rewards that you give ambassadors should drive advocacy for the brand and provide something that the ambassadors can promote.
For this example in BrandChamp, I will give ambassadors a discount code for a free product.
To do this:
-Select “Shopify Discount” for reward type.
-Select “Monetary” in the discount type section and enter the full price of your product.
-In the “Applies to” section click on “Specific Products” and enter in the product name you want to give away for free (i.e socks)
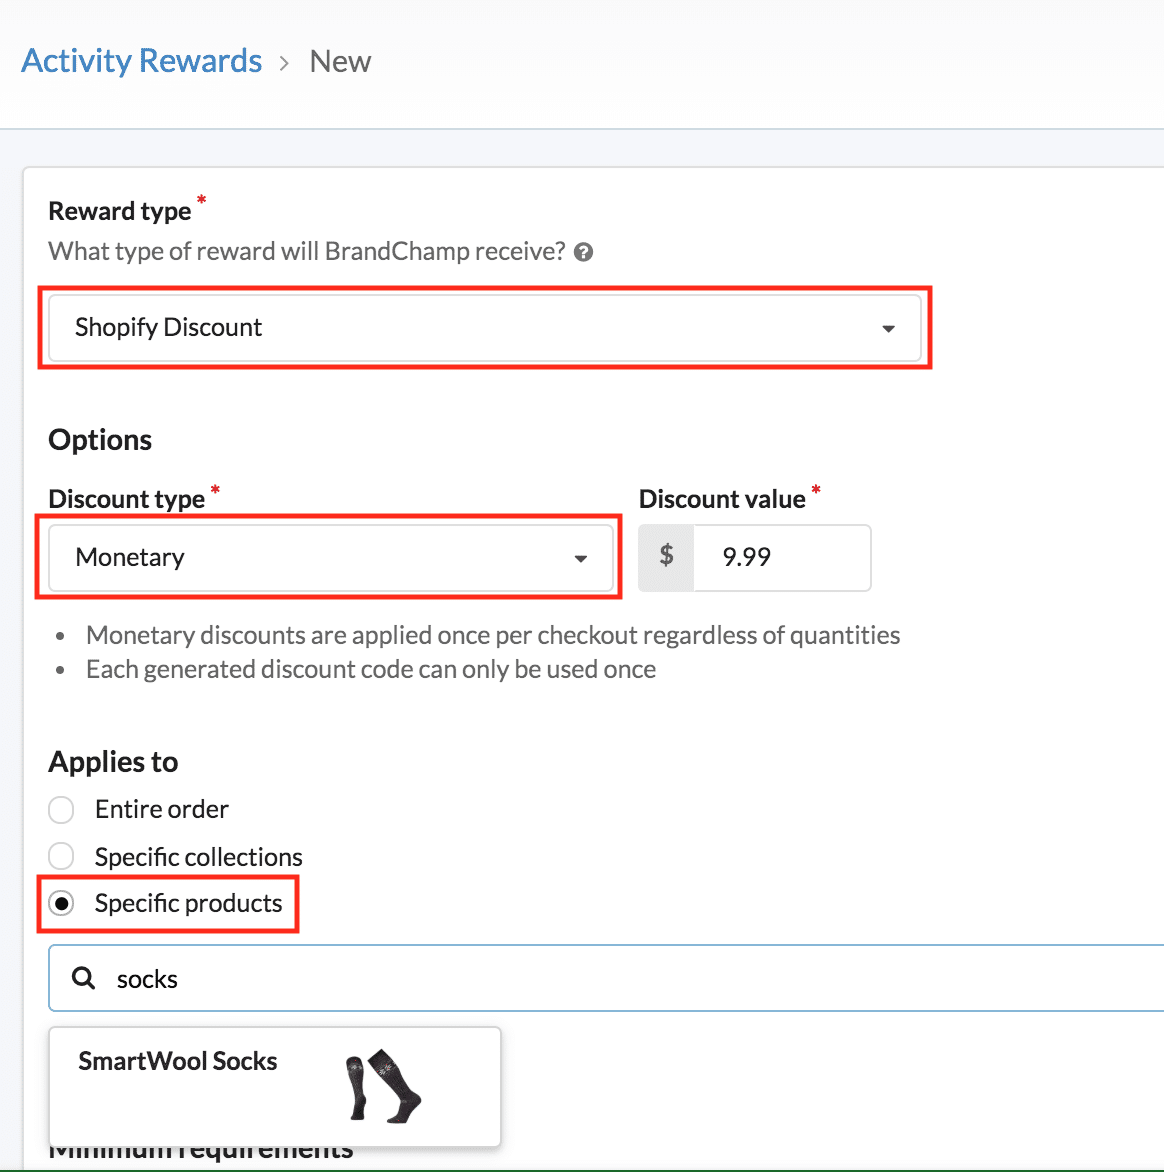
After selecting the product,
-Set the Minimum Requirements to “None”, so the ambassador can easily redeem the reward in your store
-Enter in the description. For this onboarding activity reward, we will enter “Welcome to the Program! Here is a discount code for a Free pair of Wool Socks”
-For the image you can choose either the “First product image”, a BrandChamp provided “Icon”, or upload a “Custom image”. For this reward, we will use the First product image.
-Finally, click the box for “Auto issue this reward?” so that an ambassador will immediately be able to redeem the reward when they log into their account for the first time.
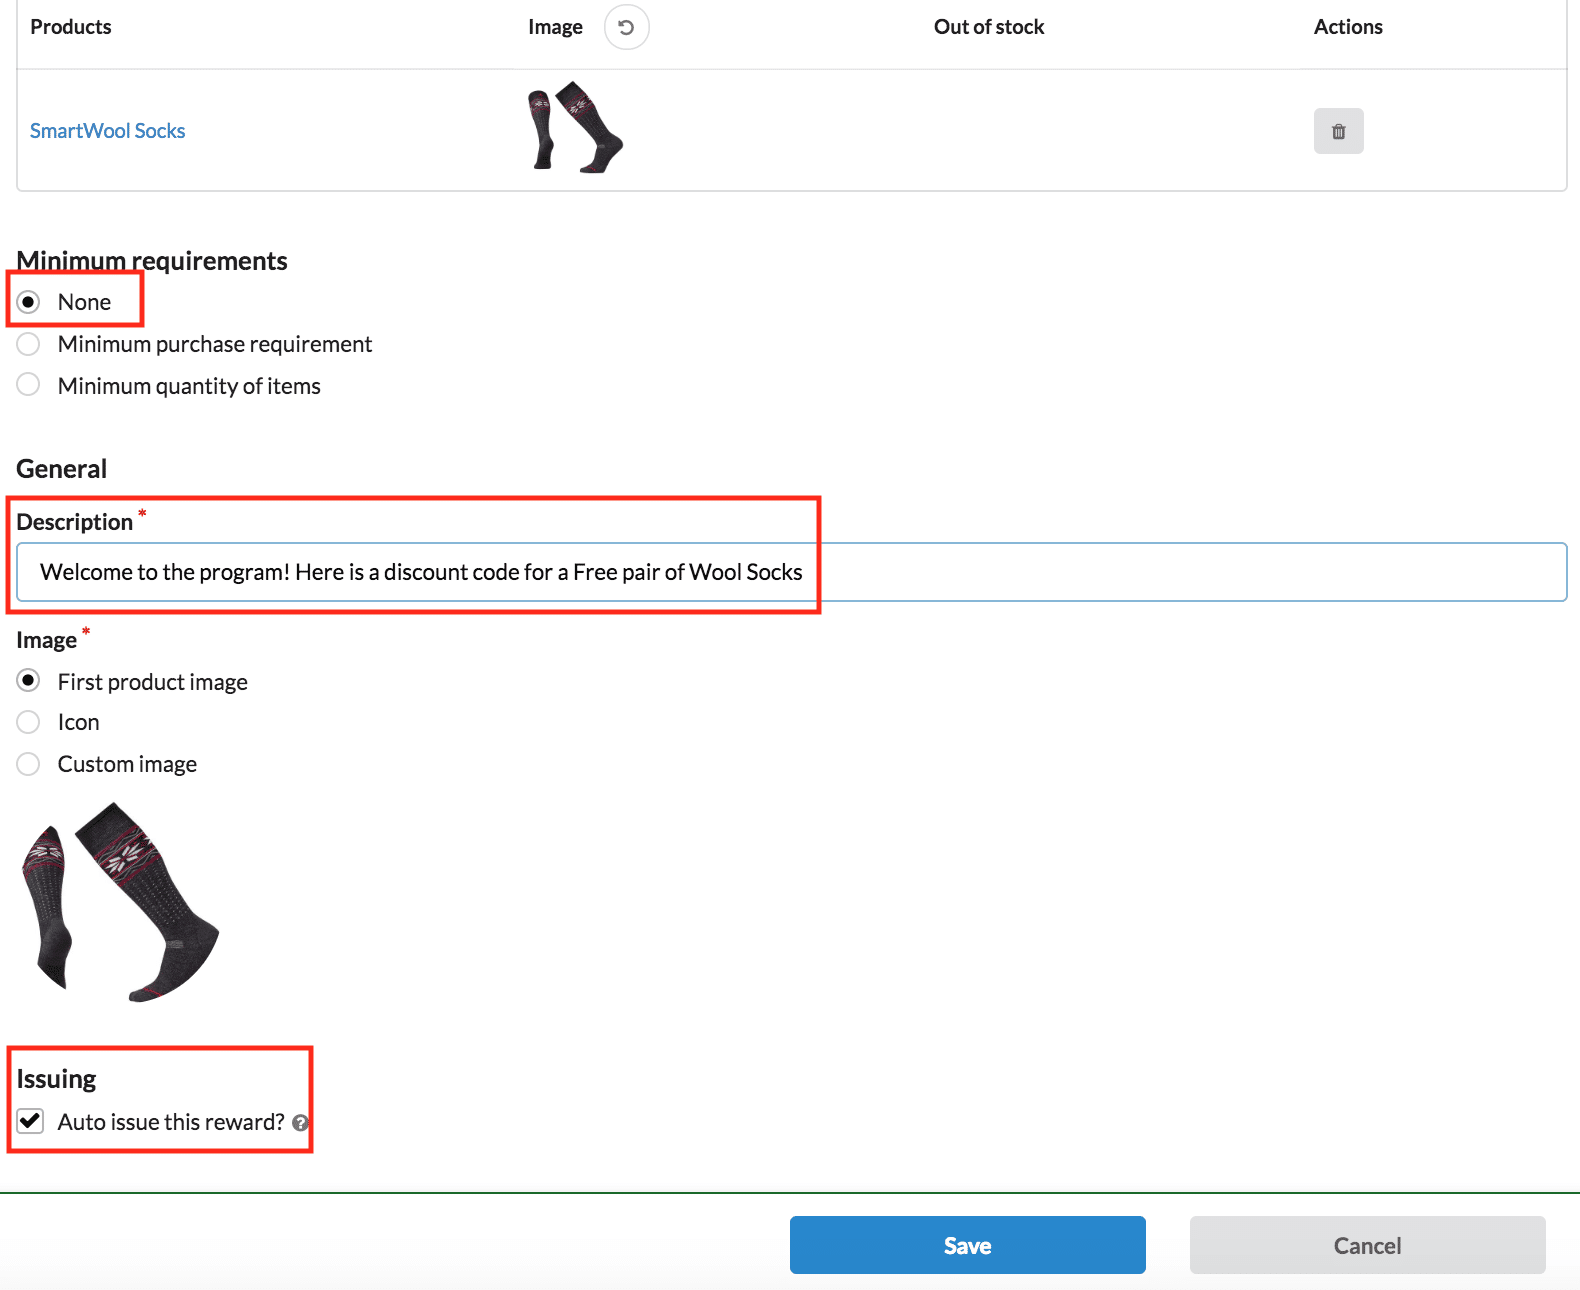
After clicking save we can go to create our “Onboarding Activity” and link this reward to the activity.
Create Onboarding Activity
When the Activity Reward is created, the next step is to set up an onboarding activity that gives the ambassador a reward for signing up.
In BrandChamp, we will create an Onboarding Activity that will issue the activity reward above when an ambassador registers for the program.
To create the Onboarding Activity go to the “Activity Types” section, and click the new button. After clicking the new button, select “Onboarding Activity”.
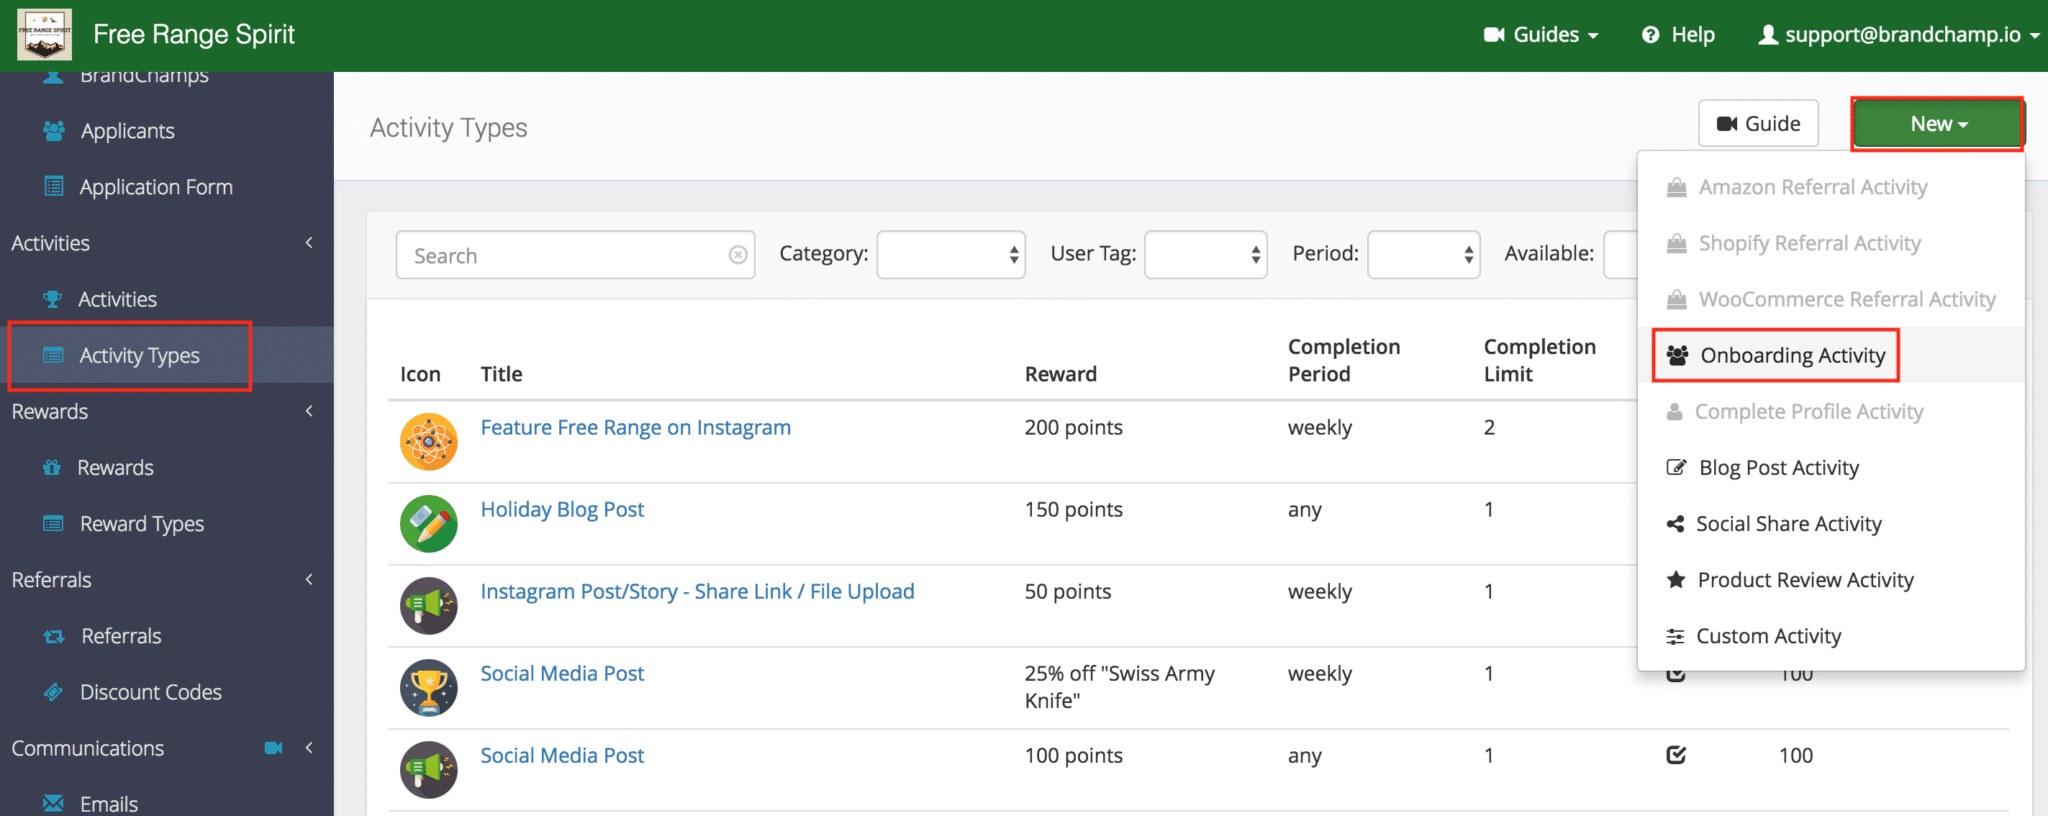
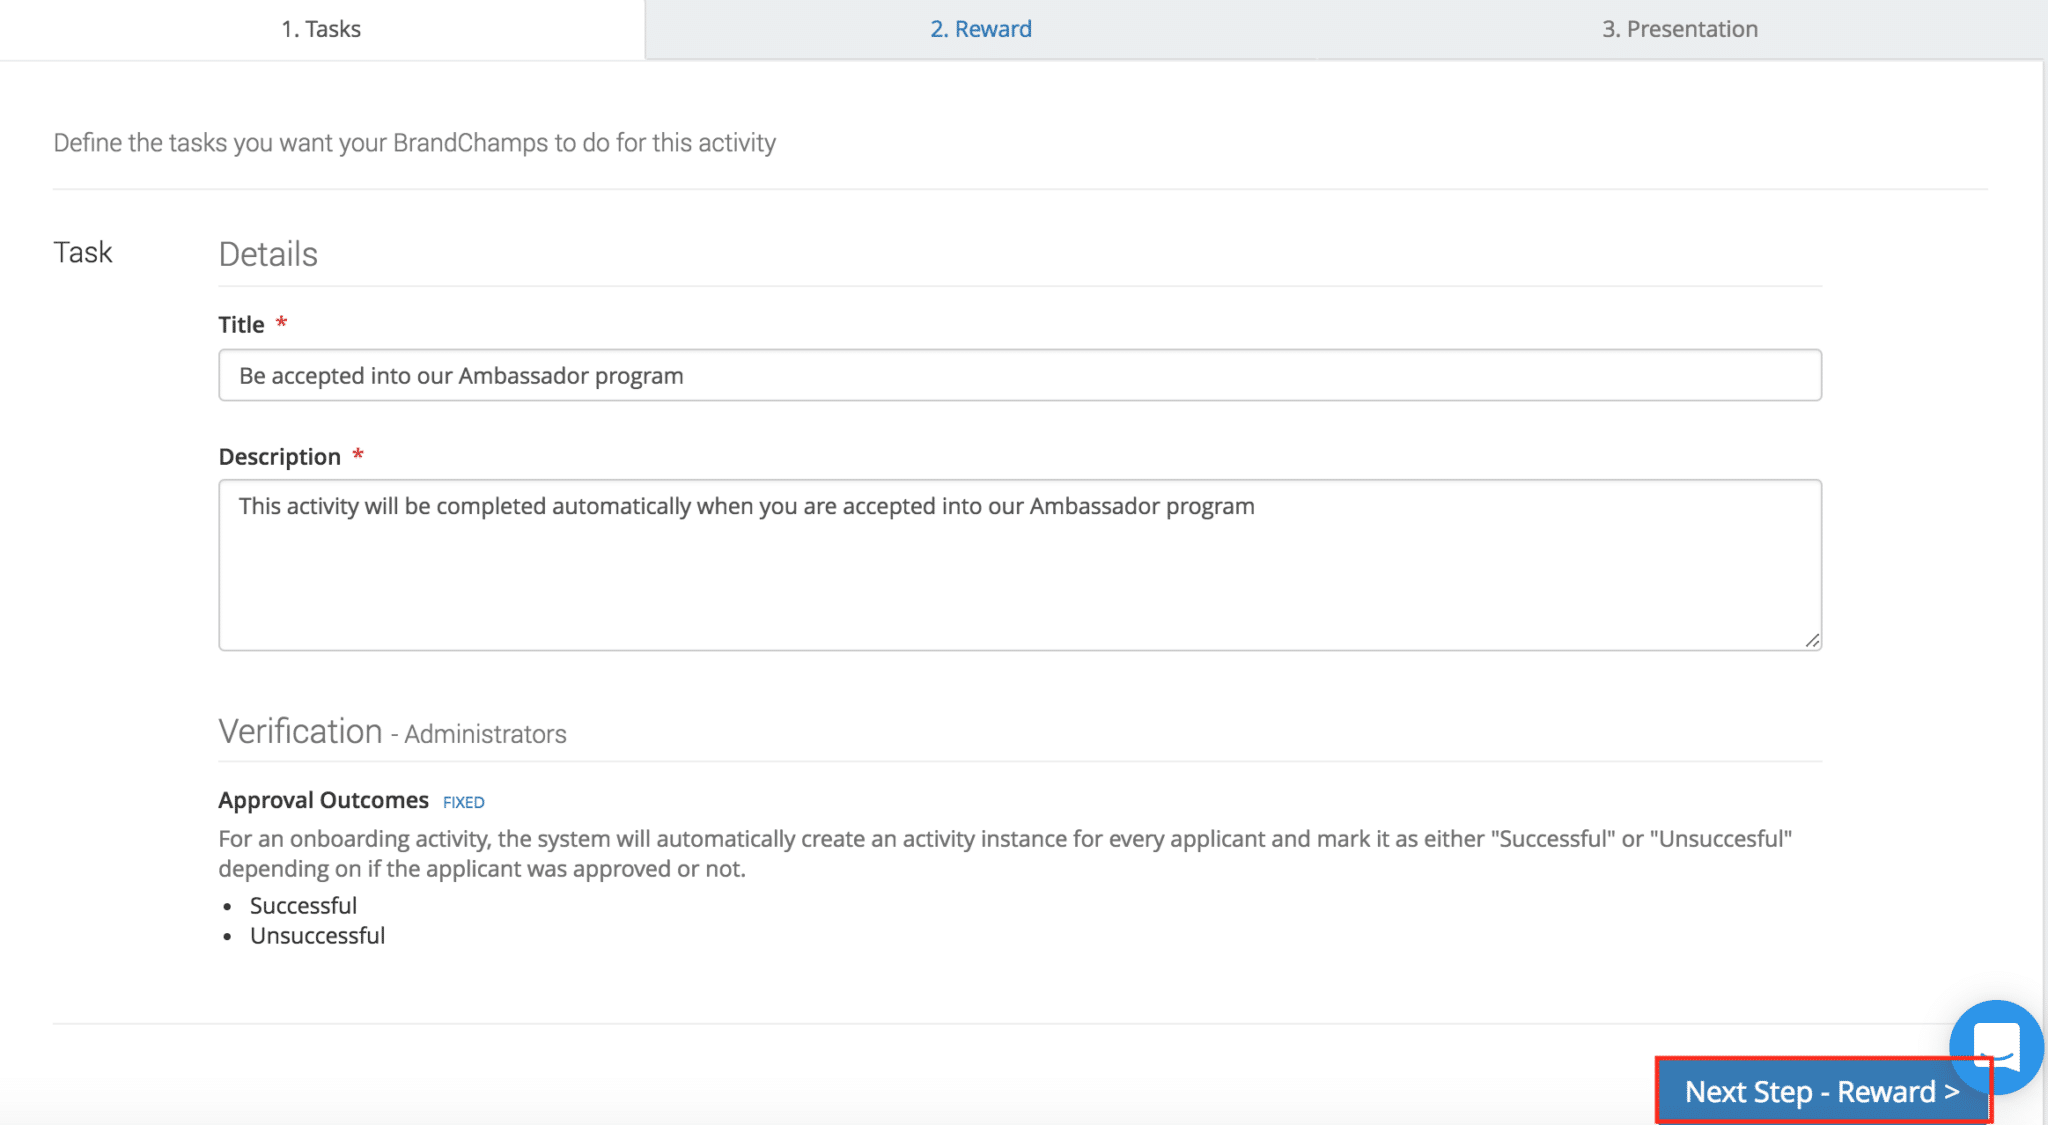
In the “Tasks” page, BrandChamp’s software fills in the task, as the activity is not viewable and is immediately completed when the ambassador logs in for the first time. From here, click the “Next Step – Reward>” button.
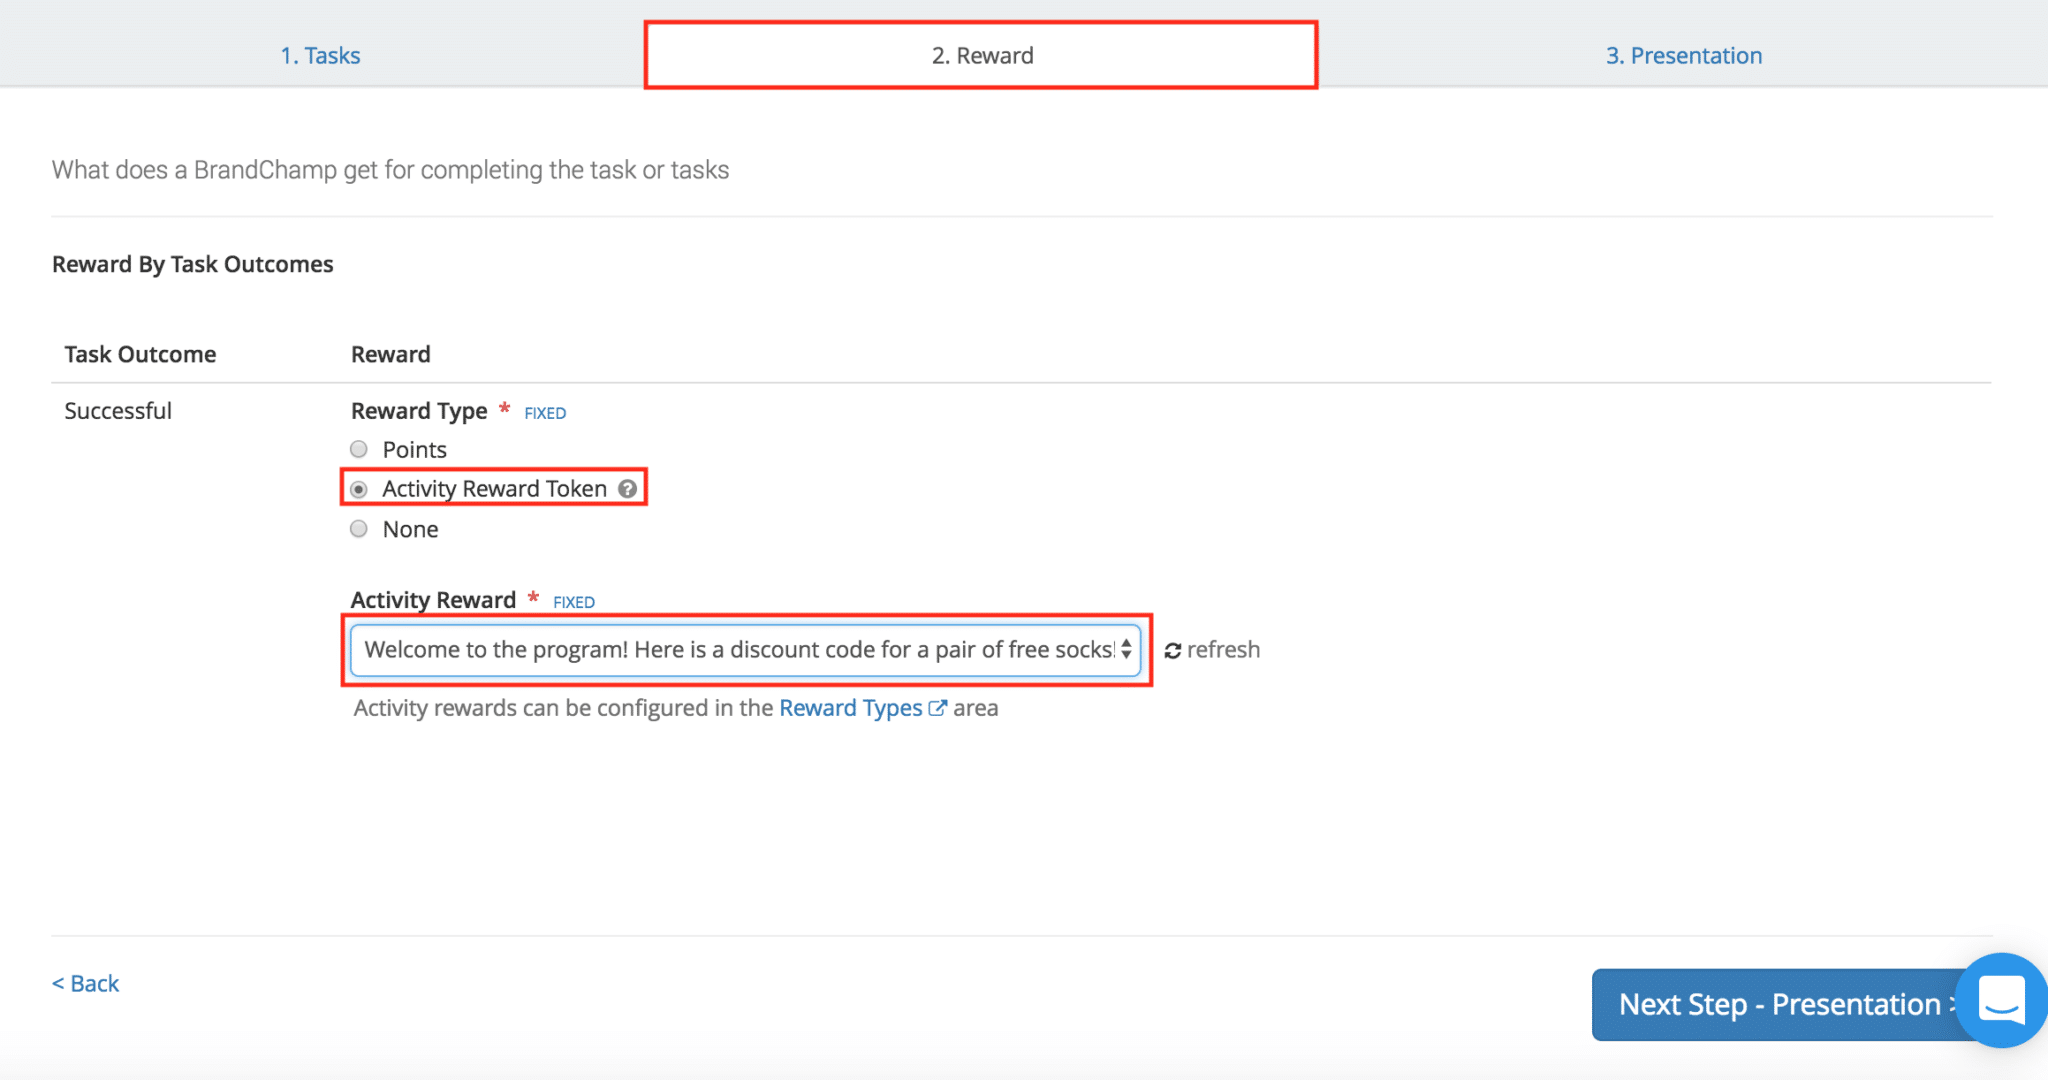
In the reward tab, we can now link the Onboarding Activity to the Activity Reward (Free Socks) we created earlier. After selecting the reward, click “Next Step – Presentation”.
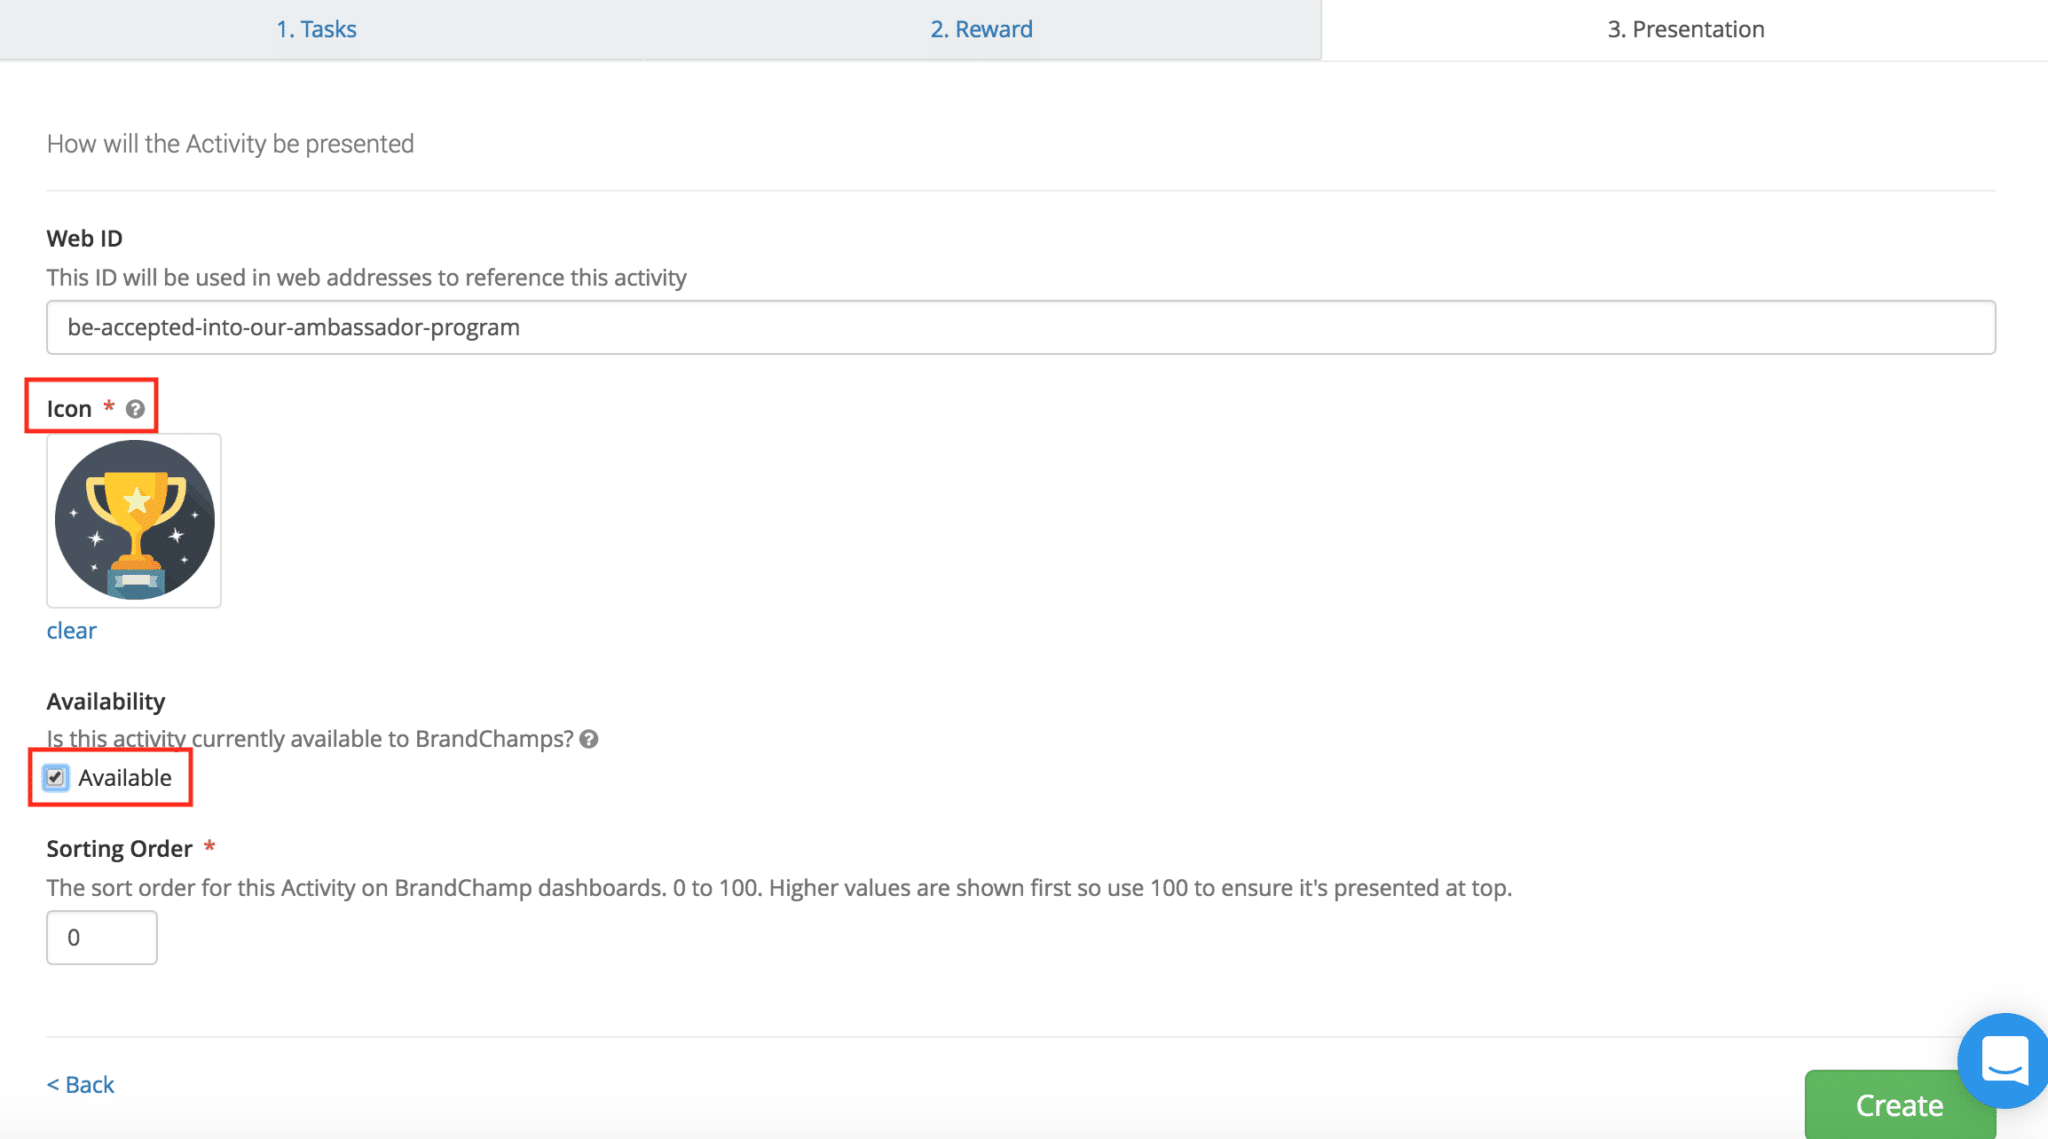
In the presentation tab, select an Icon for the activity, set the activity to available, and click “Create”. (The sorting order will not apply to this activity as it is completed immediately upon logging in)
**Remember! After creating this activity, every ambassador that is approved and registers will now be able to claim this reward.**
Adding a Test User to claim Onboarding Reward
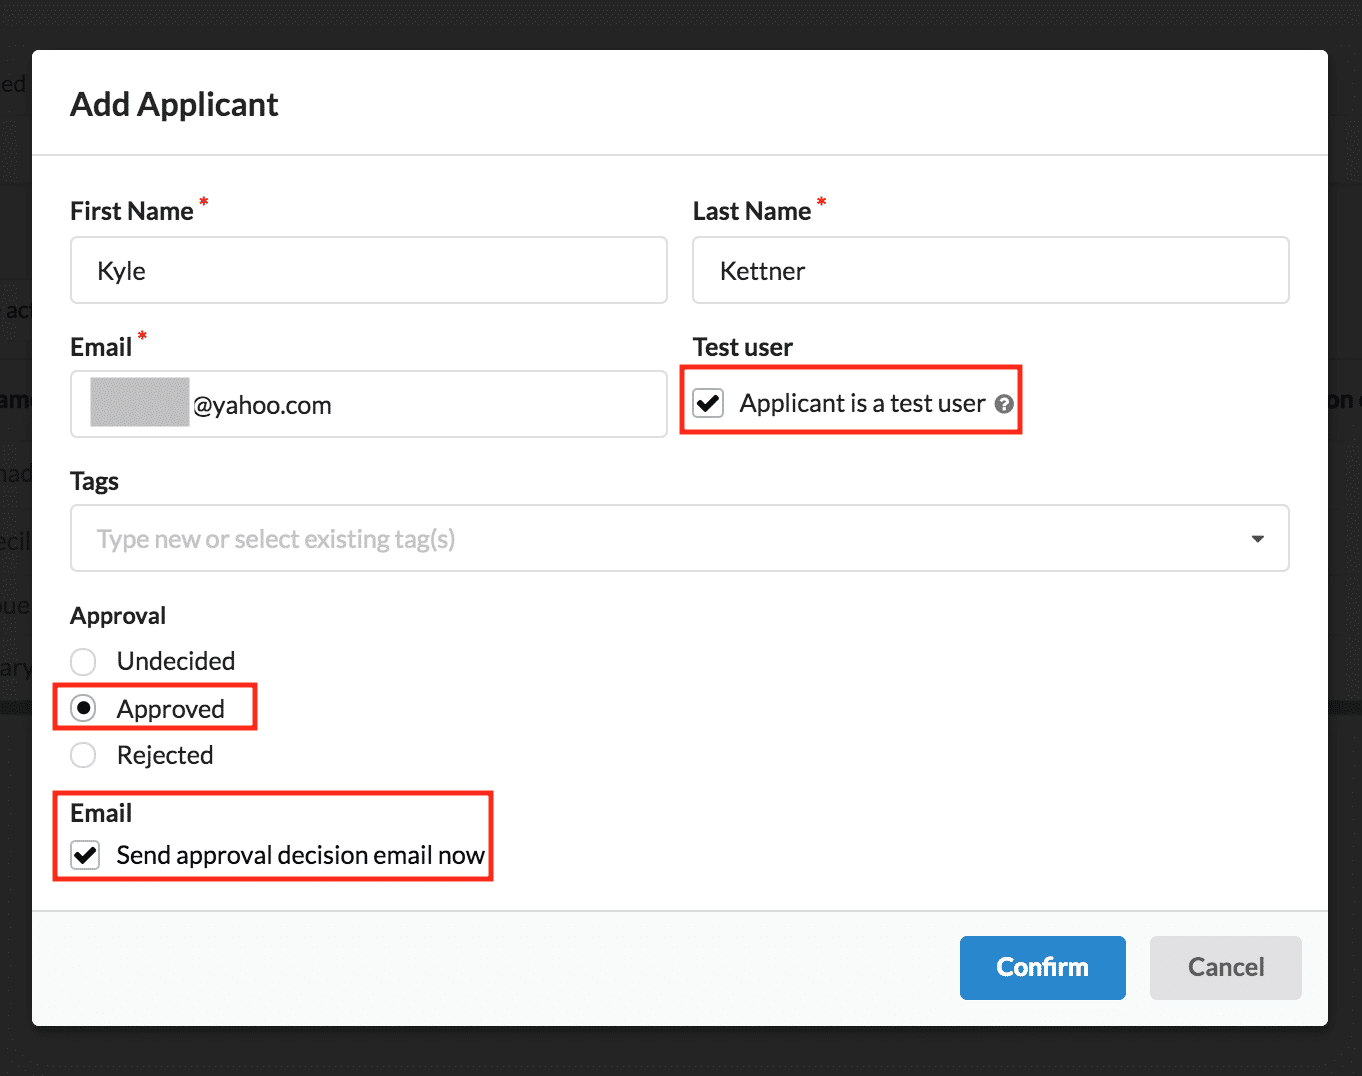
Before adding ambassador’s to the platform let’s first add ourselves as a test user to go through the onboarding process. By going through the onboarding process we can be sure that everything looks good and that the process of joining the program is efficient and rewarding.
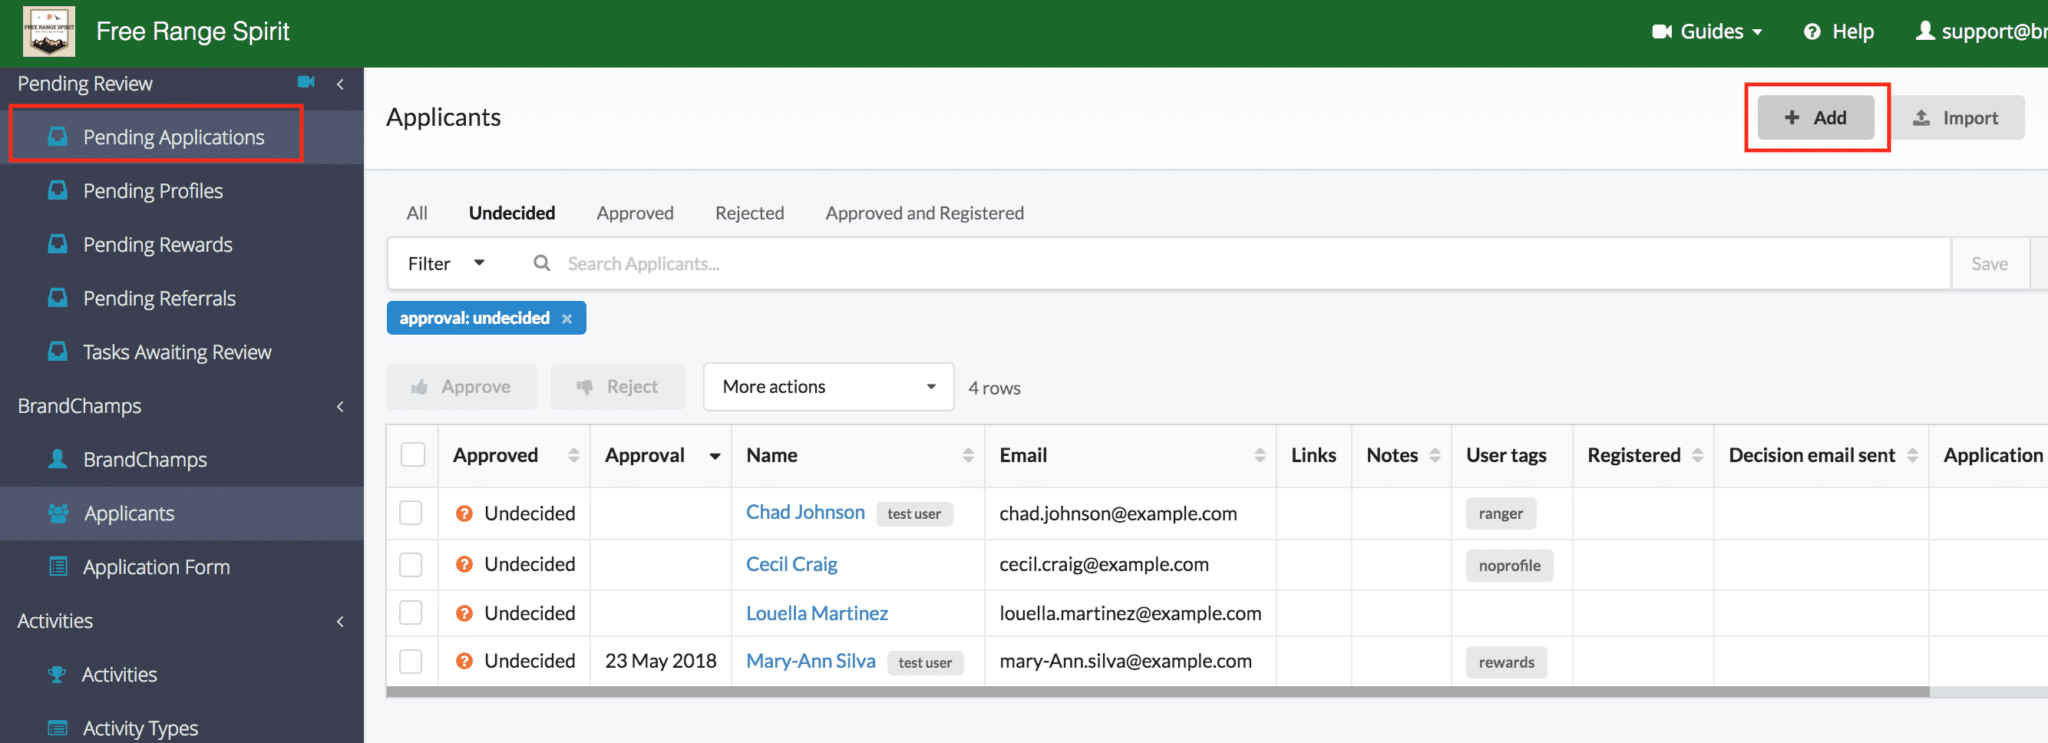
In the admin portal, go to the pending applications page and click the Add button.
From here, you will need to input another email address that isn’t associated with your BrandChamp admin email. After entering an email,
Click the “Test User” box
Check “Approved”
Finally, click “Send approval decision email now”
After confirming this test user, the software will send the ambassador the personalized applicant approval email created earlier.
In the email, the ambassador should receive your team’s welcome message, details on the program and a call to action to join the BrandChamp platform.
Testing Onboarding Process
After sending the decision email to your test user it’s now time to go through the entire onboarding process for your ambassadors. The first step is to check your email for the applicant accepted email.
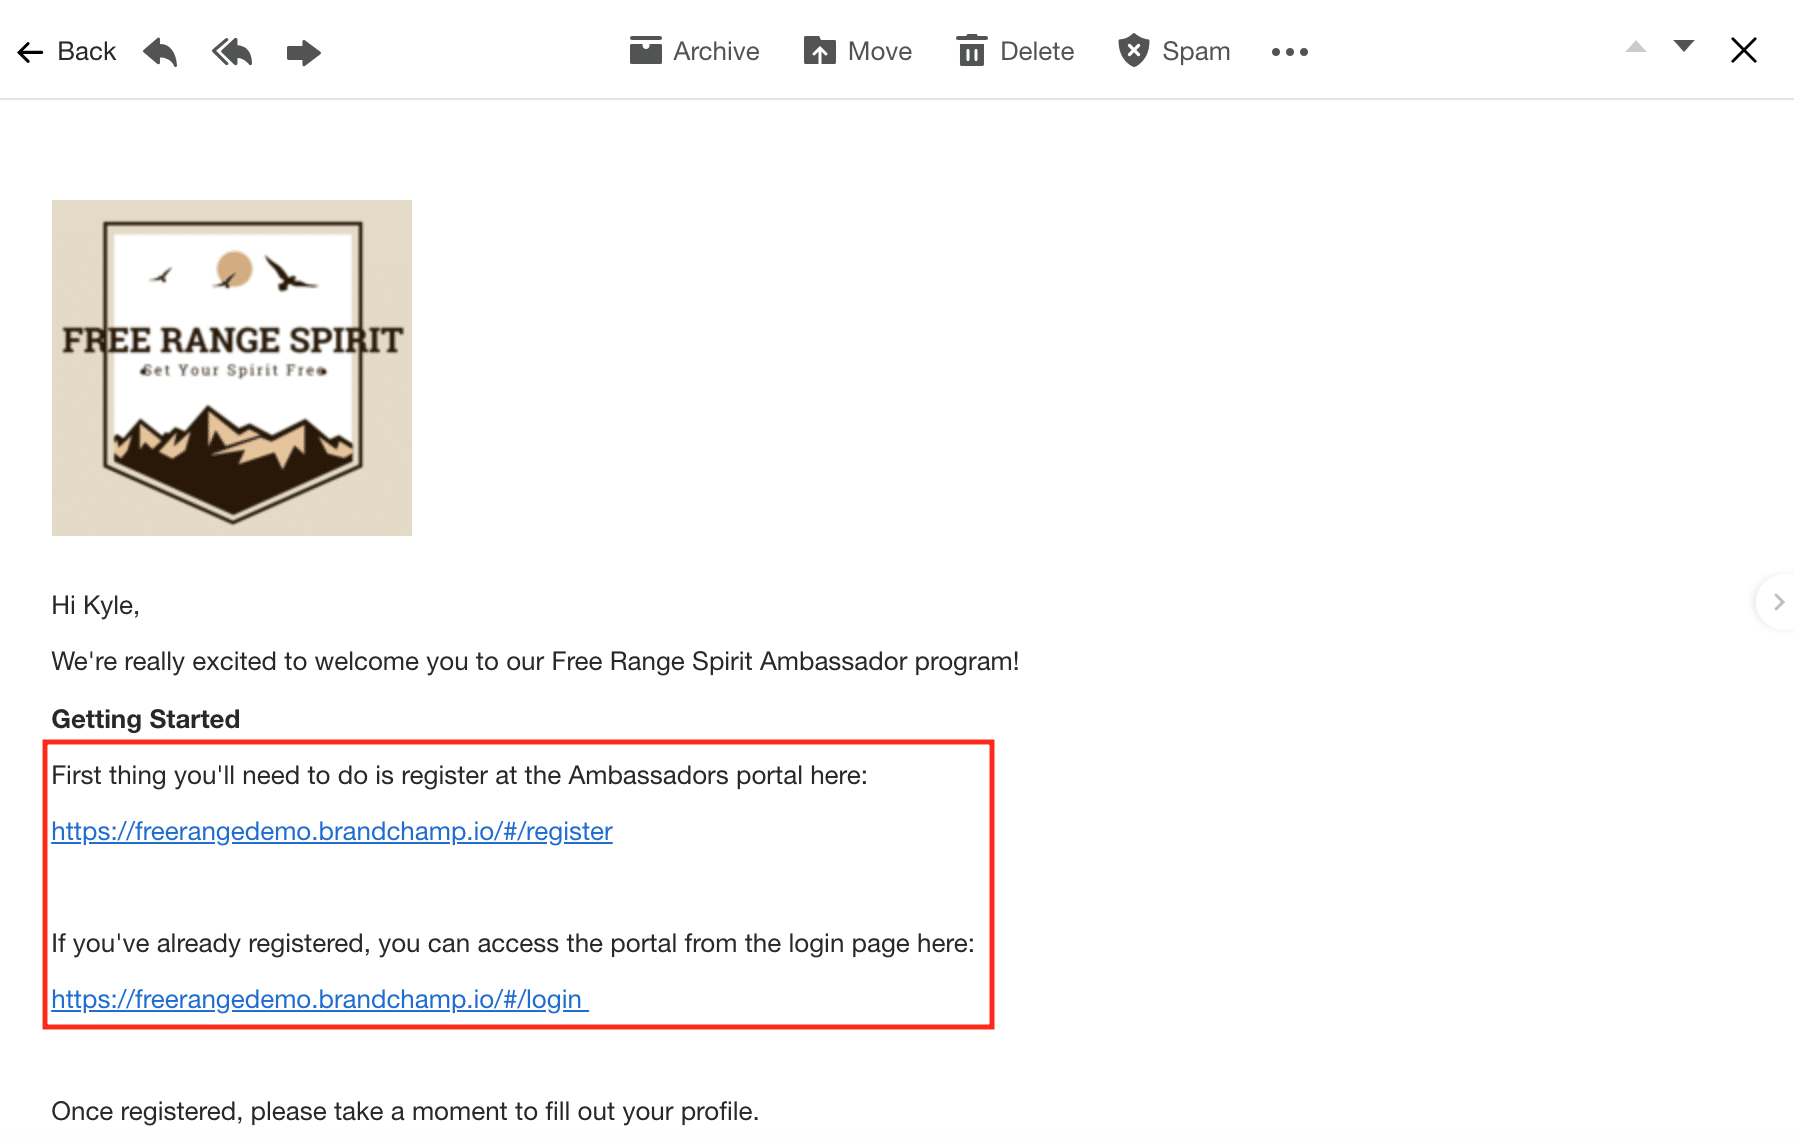
After clicking the registration link, the ambassador will be redirected to your registration page. From here, the ambassador can pick a password and login.
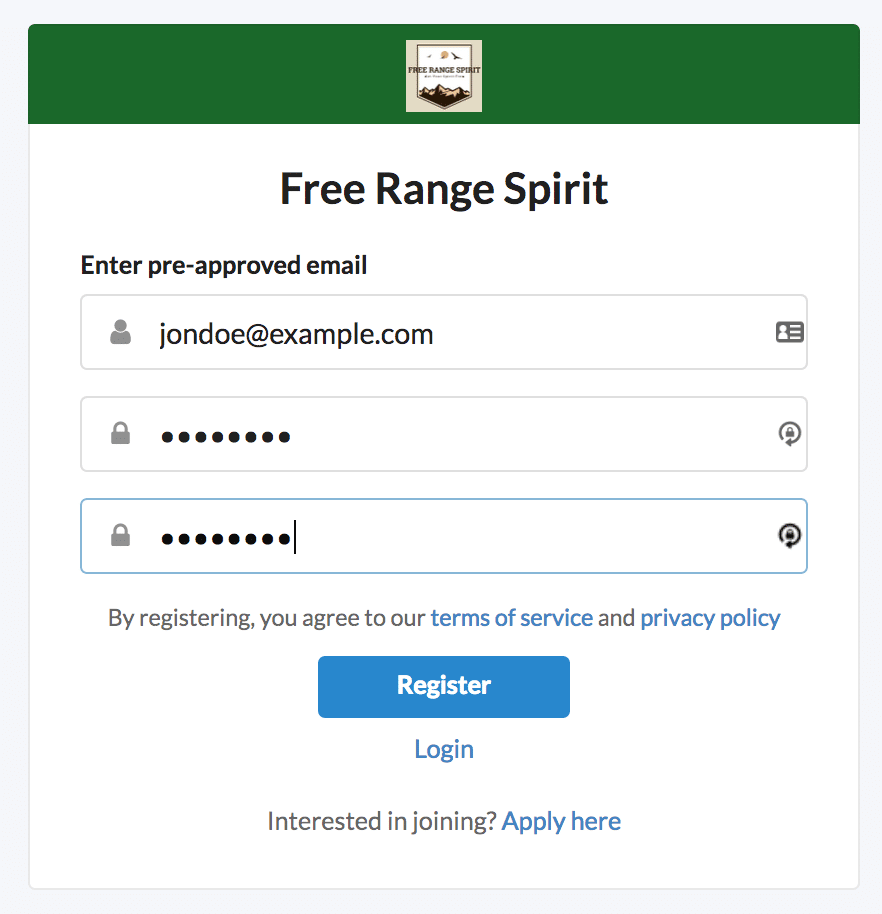
After filling in the necessary fields, click “Register”.
After the registration process, you will be redirected to the ambassador’s homepage. In the homepage, the ambassador will be notified about the reward linked to the onboarding activity.
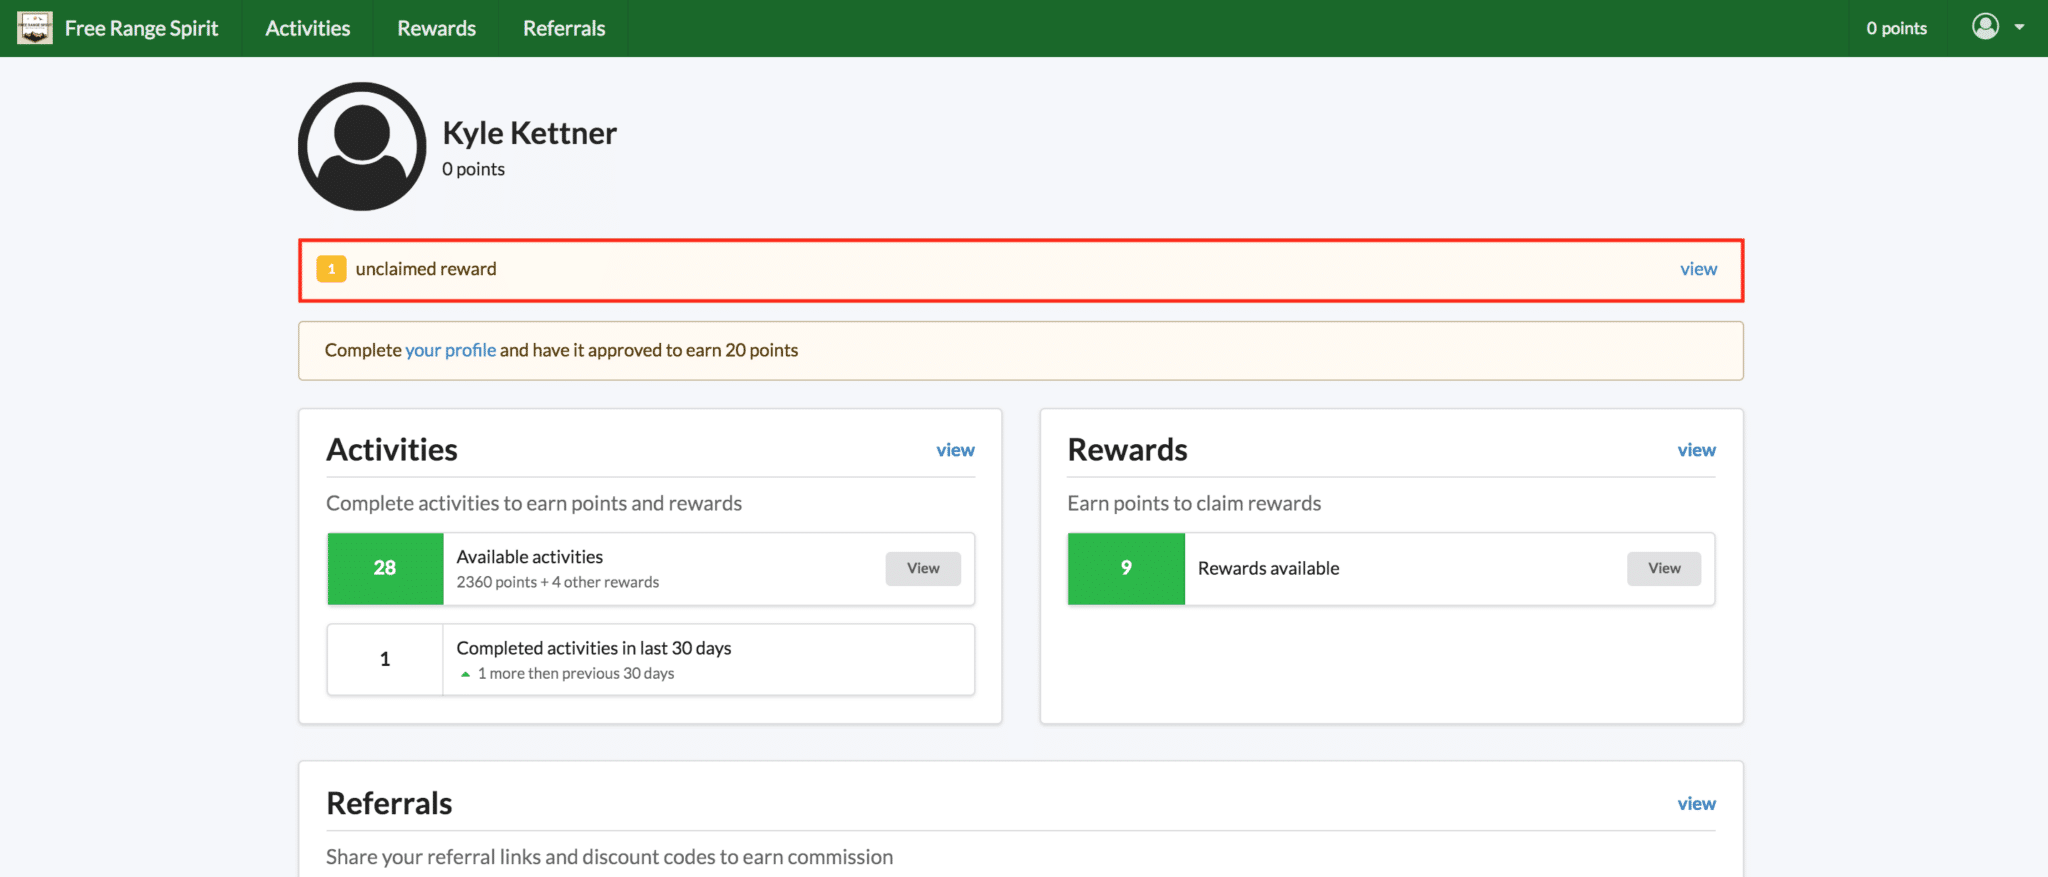
After clicking “View” they will be directed to the rewards catalog to claim the reward. To claim the reward, click the check box to select the reward and click review at the bottom of the screen.
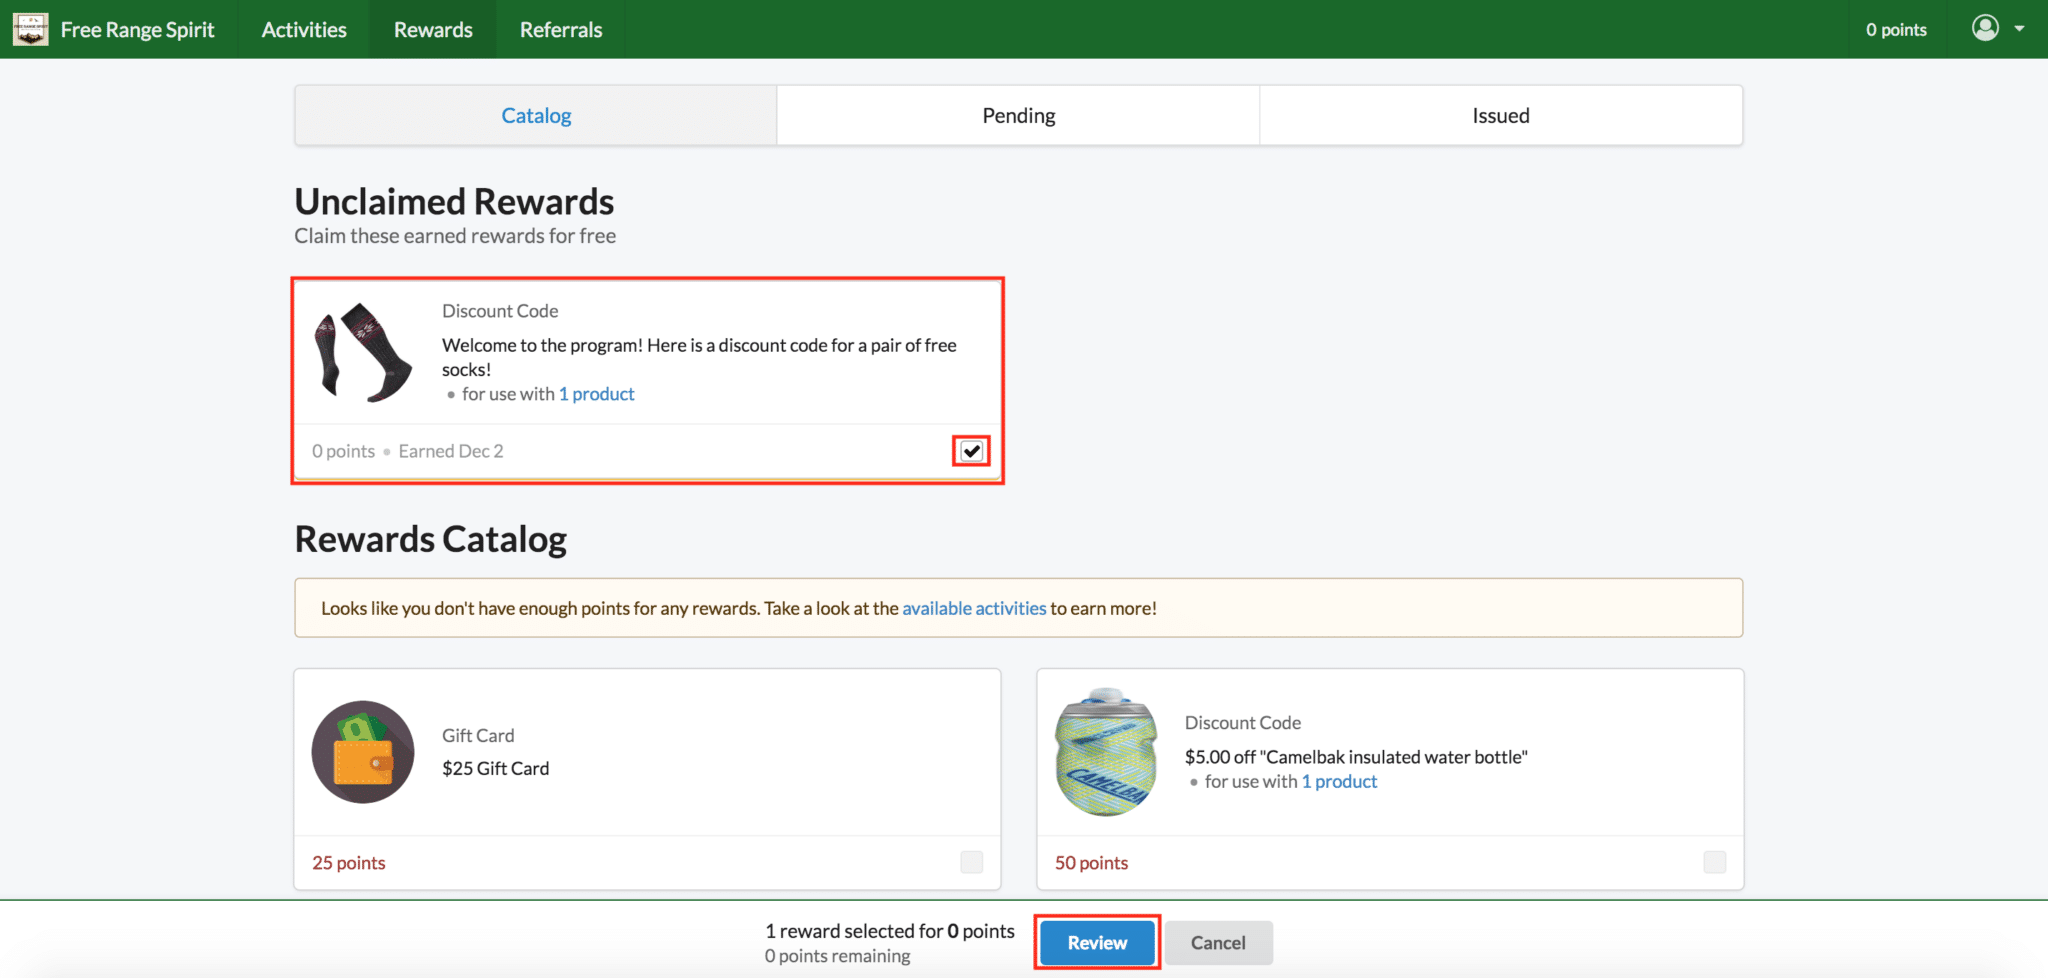
Now, by clicking “Confirm”, the software will create the discount code in the Shopify store and issue the discount code to the ambassador.
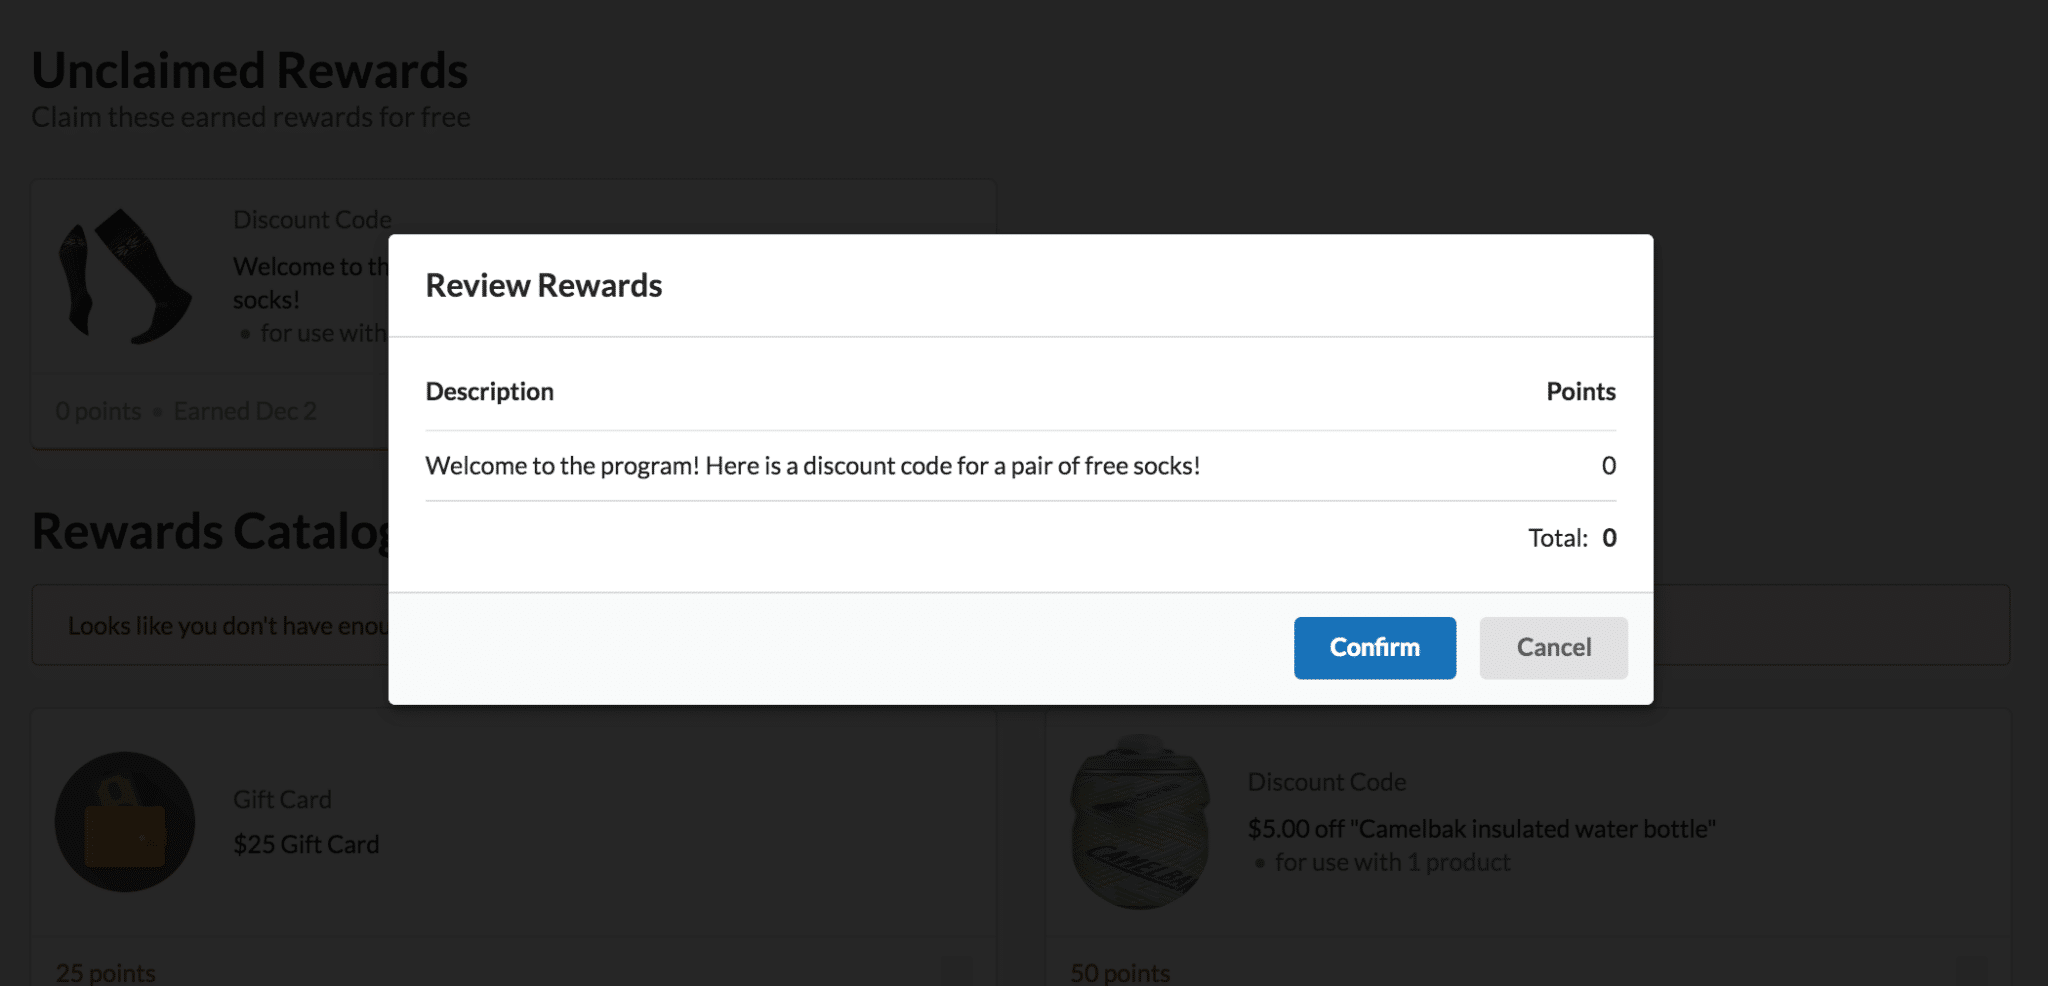
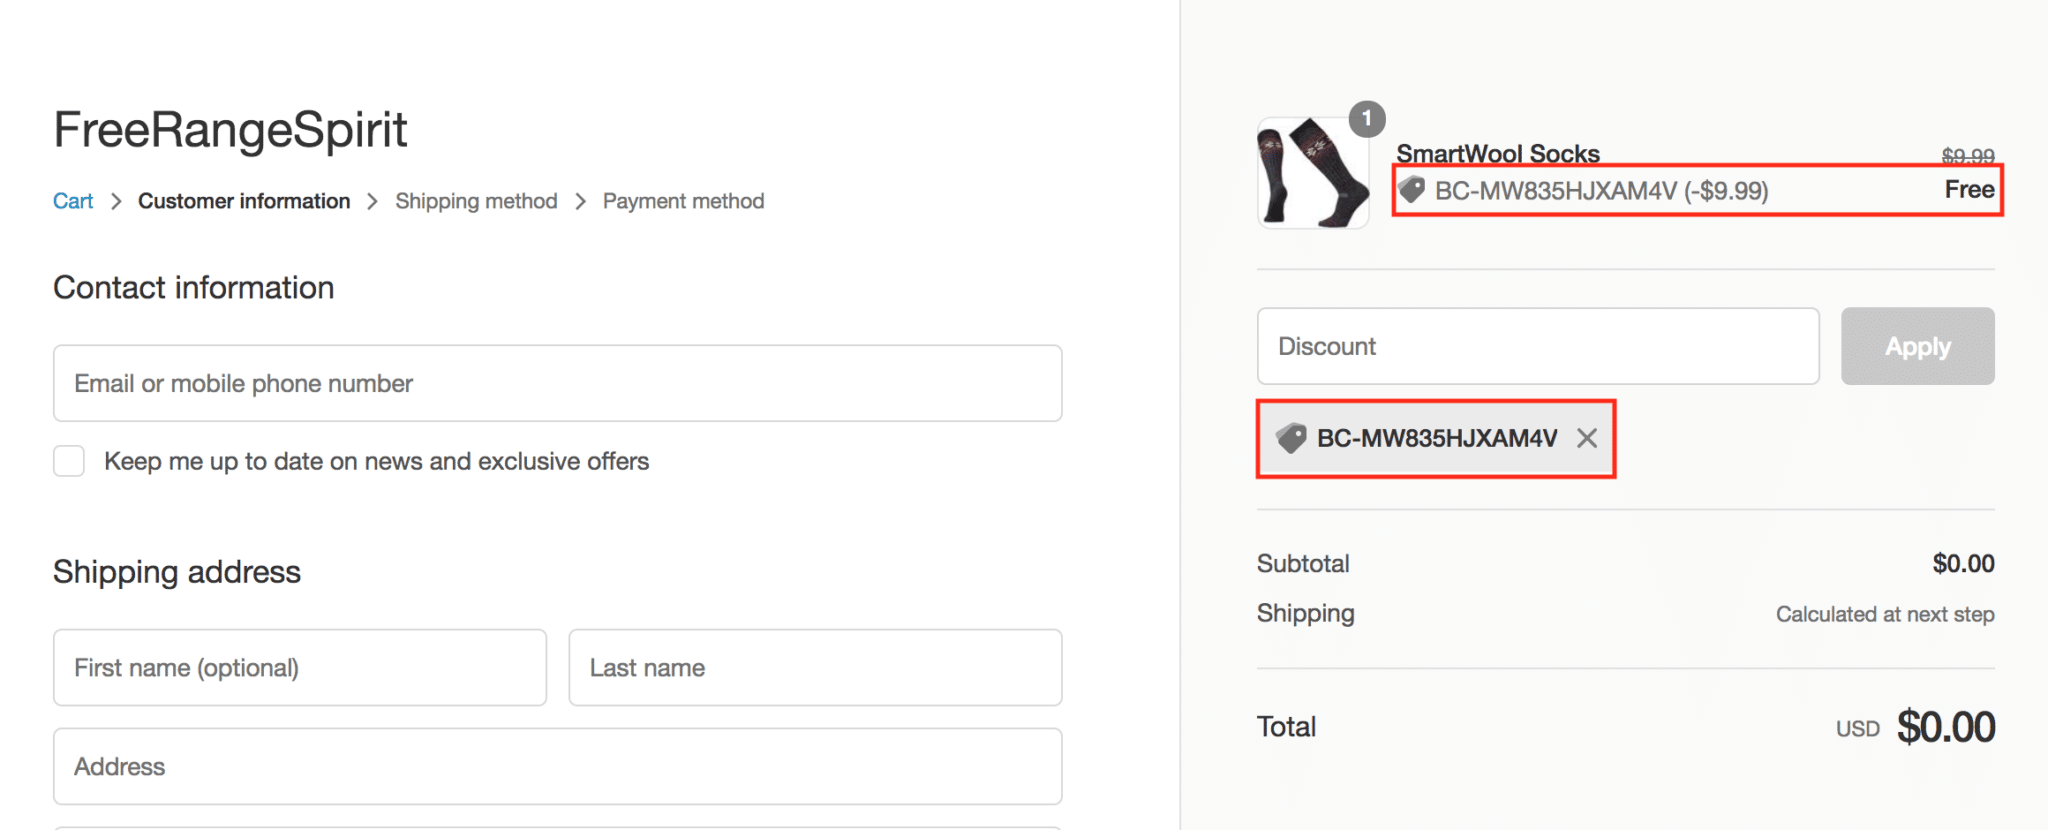
The ambassador can now copy the discount code and go to the Shopify store to use the code by clicking on the picture.

In the checkout process, the ambassador can input their discount code to receive the free pair of socks.
Closing
When a brand makes it easy for ambassadors to register for the program and get a reward right away, it improves brand loyalty and the ambassadors are more likely to actively participate in the program.
Setting up this process and doing it at scale can be a challenge but with BrandChamp it’s easy to set it up and automate the onboarding process.
By providing a positive onboarding experience, a brand can ensure that ambassadors are engaged from the moment they join.
If you currently run an ambassador program and are finding it a challenge to onboard new ambassadors, issue rewards and get them actively participating, check out how BrandChamp’s ambassador management software can help you.


